Instalación de OCS Inventory NG 2.5 en Ubuntu Server 18.04
Descripción y objetivo:
OCS Inventory es un software para inventario de hardware y software de código libre, esta aplicación nació en Francia a finales de 2005 y funciona sobre Apache, MySql y Perl. Utiliza un ligero agente en los equipos cliente que se mantiene en comunicación periódica con el servidor informando de los posibles cambios. Esto es posible tanto para equipos de nuestra red local como para ordenadores remotos que dispongan de conectividad a Internet
En este documento instalaremos desde cero un servidor OCS Inventory NG versión 2.5 en un Ubuntu Server 18.04, posteriormente instalaremos el programa cliente en un equipo y veremos los primeros datos del inventario.
Resumen de los pasos que seguiremos:
1.- Instalaremos Ubuntu Server 18.04
2.- Instalaremos todos los requisitos y dependencias
3.- Instalaremos y configuraremos OCS Inventory NG 2.5
4.- Instalaremos el agente en un equipo y veremos el inventario
1.- Instalación de Ubuntu Server 18.04
La instalación de Ubuntu se ha simplificado mucho en las ultimas versiones, si bien ya era sencillo en las versiones más antiguas, con la 18.04 es ya un juego de niños. Completaremos el asistente teniendo en cuenta un par de puntos que es bueno recordar.
- Recomendación que no obligación instalar el sistema operativo en Inglés, puesto que en caso de error nos sera mucho más fácil encontrar documentación.
- Configuramos la red, ip, puerta de enlace, servidores dns, dominio…. (La instalación permite configurar esto de manera muy sencilla)
- Durante esta instalación yo crearé el usuario “ocs” pero si lo deseamos podemos utilizar cualquier otro.
- Particionaremos el disco duro según recomendación
Una vez finalizada la instalación y verificado que tenemos conectividad a red e Internet (Haremos ping a puerta de enlace y a dns de Internet), actualizaremos el sistema.
sudo apt-get update
sudo apt-get upgrade
Ponemos el equipo en la zona horaria correspondiente, consultar vuestra zona en esta url: https://en.wikipedia.org/wiki/List_of_tz_database_time_zones
sudo timedatectl set-timezone Europe/Madrid
Nos aseguramos de que es correcto.
date
2.- Instalación y preparación de los requisitos y dependencias
2.1.- Instalamos todos los paquetes necesarios
sudo apt-get install wget build-essential apache2 php libapache2-mod-php7.2 php-gd libgd-dev unzip libapache2-mod-perl2 mysql-server libdbd-mysql-perl php-mysql php-mbstring php7.2-mbstring php-gettext php-soap php7.2-curl libxml-simple-perl libapache-dbi-perl libnet-ip-perl libsoap-lite-perl
sudo cpan -i XML::Entities Compress::Zlib Archive::Zip Mojolicious::Lite Switch Plack::Handler
2.2.- Activamos el modulo mbstring en php
sudo phpenmod mbstring
2.3.- Cambiamos el password root del MySQL que acabamos de instalar
sudo mysql_secure_installation
Securing the MySQL server deployment.

Connecting to MySQL using a blank password.

VALIDATE PASSWORD PLUGIN can be used to test passwords
and improve security. It checks the strength of password
and allows the users to set only those passwords which are
secure enough. Would you like to setup VALIDATE PASSWORD plugin?

Press y|Y for Yes, any other key for No: y

There are three levels of password validation policy:

LOW    Length >= 8
MEDIUM Length >= 8, numeric, mixed case, and special characters
STRONG Length >= 8, numeric, mixed case, special characters and dictionary                  file

Please enter 0 = LOW, 1 = MEDIUM and 2 = STRONG: 0
Please set the password for root here.

New password:

Re-enter new password:

Estimated strength of the password: 50
Do you wish to continue with the password provided?(Press y|Y for Yes, any other key for No) : y
By default, a MySQL installation has an anonymous user,
allowing anyone to log into MySQL without having to have
a user account created for them. This is intended only for
testing, and to make the installation go a bit smoother.
You should remove them before moving into a production
environment.

Remove anonymous users? (Press y|Y for Yes, any other key for No) : y
Success.


Normally, root should only be allowed to connect from
'localhost'. This ensures that someone cannot guess at
the root password from the network.

Disallow root login remotely? (Press y|Y for Yes, any other key for No) : n

 ... skipping.
By default, MySQL comes with a database named 'test' that
anyone can access. This is also intended only for testing,
and should be removed before moving into a production
environment.


Remove test database and access to it? (Press y|Y for Yes, any other key for No) : y
 - Dropping test database...
Success.

 - Removing privileges on test database...
Success.

Reloading the privilege tables will ensure that all changes
made so far will take effect immediately.

Reload privilege tables now? (Press y|Y for Yes, any other key for No) : y
Success.

All done!
2.4.- Creamos la base de datos, el usuario y el password que vamos a utilizar
Para ello nos conectamos al MySQL con el usuario root y el password que acabamos de definir. En este caso a la base de datos la llamaré ocsweb, al usuario ocsuser y al password ocspassword
sudo mysql -u root -p
CREATE DATABASE ocsweb
  DEFAULT CHARACTER SET utf8
  DEFAULT COLLATE utf8_general_ci;
GRANT ALL PRIVILEGES ON `ocsweb` .* TO 'ocsuser'@'localhost' IDENTIFIED BY 'ocspassword' WITH GRANT OPTION;
Para salir de Mysql ejecutamos “quit”
3.- Instalación y configuración del OCS Inventory NG
3.1.- Descargamos y descomprimimos
Para descargar podemos ir a la pagina web del ocs y buscar el paquete para Linux en el apartado descargas
https://www.ocsinventory-ng.org
Con el botón derecho copiaremos la url de destino del paquete gz y lo descargaremos en la carpeta tmp
cd /tmp
sudo wget https://github.com/OCSInventory-NG/OCSInventory-ocsreports/releases/download/2.5/OCSNG_UNIX_SERVER_2.5.tar.gz
Precaución, la url de destino puede ser diferente
sudo wget https://github.com/OCSInventory-NG/OCSInventory-ocsreports/releases/download/2.5/OCSNG_UNIX_SERVER_2.5.tar.gz
Precaución, el nombre del fichero gz puede ser diferente
sudo tar -zxvf OCSNG_UNIX_SERVER_2.5.tar.gz
Precaución, el nombre de carpeta puede ser diferente
cd OCSNG_UNIX_SERVER_2.5/
3.2.- Instalación
sudo ./setup.sh
Es necesario notar que durante la instalación se nos advierte sobre la falta de un módulo SOAP (*** Warning: PERL module Apache2::SOAP is not installed !), he realizado muchas instalaciones de este producto y nunca he conseguido no tener esta advertencia aún habiendo instalado dicho módulo de todas las formas posibles. Consultando documentación, en la propia web de OCS y dicho por uno de sus desarrolladores, este modulo no es necesario y no impide para nada el correcto funcionamiento del programa, por lo que omitiremos, si alguno de ustedes es capaz de evitar esta advertencia, estaré encantado de que me lo diga.
+----------------------------------------------------------+
|                                                          |
|  Welcome to OCS Inventory NG Management server setup !   |
|                                                          |
+----------------------------------------------------------+

Trying to determine which OS or Linux distribution you use
+----------------------------------------------------------+
| Checking for Apache web server binaries !                             |
+----------------------------------------------------------+

CAUTION: If upgrading Communication server from OCS Inventory NG 1.0 RC2 and
previous, please remove any Apache configuration for Communication Server!

Do you wish to continue ([y]/n)?y
Assuming Communication server 1.0 RC2 or previous is not installed
on this computer.

Starting OCS Inventory NG Management server setup from folder /tmp/OCSNG_UNIX_SERVER_2.5
Storing log in file /tmp/OCSNG_UNIX_SERVER_2.5/ocs_server_setup.log

+----------------------------------------------------------+
| Checking for database server properties...                      |
+----------------------------------------------------------+

Your MySQL client seems to be part of MySQL version 5.7.
Your computer seems to be running MySQL 4.1 or higher, good ;-)

Which host is running database server [localhost] ?
OK, database server is running on host localhost ;-)

On which port is running database server [3306] ?
OK, database server is running on port 3306 ;-)


+----------------------------------------------------------+
| Checking for Apache web server daemon...                              |
+----------------------------------------------------------+

Where is Apache daemon binary [/usr/sbin/apache2ctl] ?
OK, using Apache daemon /usr/sbin/apache2ctl ;-)


+----------------------------------------------------------+
| Checking for Apache main configuration file...                  |
+----------------------------------------------------------+

Where is Apache main configuration file [/etc/apache2/apache2.conf] ?
OK, using Apache main configuration file /etc/apache2/apache2.conf ;-)


+----------------------------------------------------------+
| Checking for Apache user account...                                    |
+----------------------------------------------------------+

Which user account is running Apache web server [www-data] ?
OK, Apache is running under user account www-data ;-)


+----------------------------------------------------------+
| Checking for Apache group...                                                  |
+----------------------------------------------------------+

Which user group is running Apache web server [www-data] ?
OK, Apache is running under users group www-data ;-)


+----------------------------------------------------------+
| Checking for Apache Include configuration directory...   |
+----------------------------------------------------------+

Setup found Apache Include configuration directory in
/etc/apache2/conf-available.
Setup will put OCS Inventory NG Apache configuration in this directory.
Where is Apache Include configuration directory [/etc/apache2/conf-available] ?
OK, Apache Include configuration directory /etc/apache2/conf-available found ;-)


+----------------------------------------------------------+
| Checking for PERL Interpreter...                                              |
+----------------------------------------------------------+

Found PERL interpreter at </usr/bin/perl> ;-)
Where is PERL interpreter binary [/usr/bin/perl] ?
OK, using PERL interpreter /usr/bin/perl ;-)


Do you wish to setup Communication server on this computer ([y]/n)?


+----------------------------------------------------------+
|             Checking for Make utility...                 |
+----------------------------------------------------------+

OK, Make utility found at </usr/bin/make> ;-)

+----------------------------------------------------------+
|        Checking for Apache mod_perl version...           |
+----------------------------------------------------------+

Checking for Apache mod_perl version 1.99_22 or higher
Found that mod_perl version 1.99_22 or higher is available.
OK, Apache is using mod_perl version 1.99_22 or higher ;-)

+----------------------------------------------------------+
|    Checking for Communication server log directory...    |
+----------------------------------------------------------+

Communication server can create detailed logs. This logs can be enabled
by setting integer value of LOGLEVEL to 1 in Administration console
menu Configuration.
Where to put Communication server log directory [/var/log/ocsinventory-server] ?
OK, Communication server will put logs into directory /var/log/ocsinventory-server ;-)

+----------------------------------------------------------------------------+
|    Checking for Communication server plugins configuration directory...    |
+----------------------------------------------------------------------------+

Communication server need a directory for plugins configuration files.
Where to put Communication server plugins configuration files [/etc/ocsinventory-server/plugins] ?
OK, Communication server will put plugins configuration files into directory /etc/ocsinventory-server/plugins ;-)

+-------------------------------------------------------------------+
|   Checking for Communication server plugins perl directory...     |
+-------------------------------------------------------------------+

Communication server need a directory for plugins Perl modules files.
Where to put Communication server plugins Perl modules files [/etc/ocsinventory-server/perl] ?
OK, Communication server will put plugins Perl modules files into directory /etc/ocsinventory-server/perl ;-)


+----------------------------------------------------------+
| Checking for required Perl Modules...                                 |
+----------------------------------------------------------+

Checking for DBI PERL module...
Found that PERL module DBI is available.
Checking for Apache::DBI PERL module...
Found that PERL module Apache::DBI is available.
Checking for DBD::mysql PERL module...
Found that PERL module DBD::mysql is available.
Checking for Compress::Zlib PERL module...
Found that PERL module Compress::Zlib is available.
Checking for XML::Simple PERL module...
Found that PERL module XML::Simple is available.
Checking for Net::IP PERL module...
Found that PERL module Net::IP is available.
Checking for SOAP::Lite Perl module...
Found that PERL module SOAP::Lite is available.
Checking for Archive::Zip Perl module...
Found that PERL module Archive::Zip is available.

+----------------------------------------------------------+
|         Checking for optional Perl Modules...            |
+----------------------------------------------------------+

Checking for Apache2::SOAP PERL module...
*** Warning: PERL module Apache2::SOAP is not installed !
This module is only required by OCS Inventory NG SOAP Web Service.
Do you wish to continue ([y]/n] ?
Checking for XML::Entities PERL module...
Found that PERL module XML::Entities is available.


Do you wish to setup Rest API server on this computer ([y]/n)?

+----------------------------------------------------------+
| Checking for REST API Dependencies ...                         |
+----------------------------------------------------------+

Found that PERL module Mojolicious::Lite is available.
Found that PERL module Switch is available.
Found that PERL module Plack::Handler is available.

+----------------------------------------------------------+
| Configuring REST API Server files ...                          |
+----------------------------------------------------------+

Where do you want the API code to be store [/usr/local/share/perl/5.26.1] ?
Copying files to /usr/local/share/perl/5.26.1

+----------------------------------------------------------+
| Configuring REST API Server configuration files ...            |
+----------------------------------------------------------+


+----------------------------------------------------------+
|                 OK, looks good ;-)                       |
|                                                          |
|     Configuring Communication server Perl modules...     |
+----------------------------------------------------------+

Checking if your kit is complete...
Looks good
Generating a Unix-style Makefile
Writing Makefile for Apache::Ocsinventory
Writing MYMETA.yml and MYMETA.json

+----------------------------------------------------------+
|                 OK, looks good ;-)                       |
|                                                          |
|      Preparing Communication server Perl modules...      |
+----------------------------------------------------------+


+----------------------------------------------------------+
|                 OK, prepare finshed ;-)                  |
|                                                          |
|     Installing Communication server Perl modules...      |
+----------------------------------------------------------+


+----------------------------------------------------------+
| OK, Communication server Perl modules install finished;-)|
|                                                          |
|     Creating Communication server log directory...       |
+----------------------------------------------------------+

Creating Communication server log directory /var/log/ocsinventory-server.

Fixing Communication server log directory files permissions.
Configuring logrotate for Communication server.
Removing old communication server logrotate file /etc/logrotate.d/ocsinventory-NG
Writing communication server logrotate to file /etc/logrotate.d/ocsinventory-server


+----------------------------------------------------------------------+
|        OK, Communication server log directory created ;-)            |
|                                                                      |
|   Creating Communication server plugins configuration directory...   |
+----------------------------------------------------------------------+

Creating Communication server plugins configuration directory /etc/ocsinventory-server/plugins.


+----------------------------------------------------------------------+
| OK, Communication server plugins configuration directory created ;-) |
|                                                                      |
|        Creating Communication server plugins Perl directory...       |
+----------------------------------------------------------------------+

Creating Communication server plugins Perl directory /etc/ocsinventory-server/perl.


+----------------------------------------------------------------------+
|     OK, Communication server plugins Perl directory created ;-)      |
|                                                                      |
|               Now configuring Apache web server...                   |
+----------------------------------------------------------------------+

To ensure Apache loads mod_perl before OCS Inventory NG Communication Server,
Setup can name Communication Server Apache configuration file
'z-ocsinventory-server.conf' instead of 'ocsinventory-server.conf'.
Do you allow Setup renaming Communication Server Apache configuration file
to 'z-ocsinventory-server.conf' ([y]/n) ?
OK, using 'z-ocsinventory-server.conf' as Communication Server Apache configuration file
Removing old communication server configuration to file /etc/apache2/conf-available/ocsinventory.conf
Writing communication server configuration to file /etc/apache2/conf-available/z-ocsinventory-server.conf

+----------------------------------------------------------------------+
|       OK, Communication server setup successfully finished ;-)       |
|                                                                      |
| Please, review /etc/apache2/conf-available/z-ocsinventory-server.conf |
|         to ensure all is good. Then restart Apache daemon.           |
+----------------------------------------------------------------------+


Do you wish to setup Administration Server (Web Administration Console)
on this computer ([y]/n)?

+----------------------------------------------------------+
|    Checking for Administration Server directories...     |
+----------------------------------------------------------+

CAUTION: Setup now install files in accordance with Filesystem Hierarchy
Standard. So, no file is installed under Apache root document directory
(Refer to Apache configuration files to locate it).
If you're upgrading from OCS Inventory NG Server 1.01 and previous, YOU
MUST REMOVE (or move) directories 'ocsreports' and 'download' from Apache
root document directory.
If you choose to move directory, YOU MUST MOVE 'download' directory to
Administration Server writable/cache directory (by default
/var/lib/ocsinventory-reports), especially if you use deployment feature.

Do you wish to continue ([y]/n)?
Assuming directories 'ocsreports' and 'download' removed from
Apache root document directory.

Where to copy Administration Server static files for PHP Web Console
[/usr/share/ocsinventory-reports] ?
OK, using directory /usr/share/ocsinventory-reports to install static files ;-)

Where to create writable/cache directories for deployment packages,
administration console logs, IPDiscover and SNMP [/var/lib/ocsinventory-reports] ?
OK, writable/cache directory is /var/lib/ocsinventory-reports ;-)


+----------------------------------------------------------+
|         Checking for required Perl Modules...            |
+----------------------------------------------------------+

Checking for DBI PERL module...
Found that PERL module DBI is available.
Checking for DBD::mysql PERL module...
Found that PERL module DBD::mysql is available.
Checking for XML::Simple PERL module...
Found that PERL module XML::Simple is available.
Checking for Net::IP PERL module...
Found that PERL module Net::IP is available.

+----------------------------------------------------------+
|      Installing files for Administration server...       |
+----------------------------------------------------------+

Creating PHP directory /usr/share/ocsinventory-reports/ocsreports.
Copying PHP files to /usr/share/ocsinventory-reports/ocsreports.
Fixing permissions on directory /usr/share/ocsinventory-reports/ocsreports.
Creating database configuration file /usr/share/ocsinventory-reports/ocsreports/dbconfig.inc.php.
Creating IPDiscover directory /var/lib/ocsinventory-reports/ipd.
Fixing permissions on directory /var/lib/ocsinventory-reports/ipd.
Creating packages directory /var/lib/ocsinventory-reports/download.
Fixing permissions on directory /var/lib/ocsinventory-reports/download.
Creating snmp mibs directory /var/lib/ocsinventory-reports/snmp.
Fixing permissions on directory /var/lib/ocsinventory-reports/snmp.
Creating Administration server log files directory /var/lib/ocsinventory-reports/logs.
Fixing permissions on directory /var/lib/ocsinventory-reports/logs.
Creating Administration server scripts log files directory /var/lib/ocsinventory-reports/scripts.
Fixing permissions on directory /var/lib/ocsinventory-reports/scripts.
Configuring IPDISCOVER-UTIL Perl script.
Installing IPDISCOVER-UTIL Perl script.
Fixing permissions on IPDISCOVER-UTIL Perl script.
Writing Administration server configuration to file /etc/apache2/conf-available/ocsinventory-reports.conf

+----------------------------------------------------------------------+
|        OK, Administration server installation finished ;-)           |
|                                                                      |
| Please, review /etc/apache2/conf-available/ocsinventory-reports.conf
|          to ensure all is good and restart Apache daemon.            |
|                                                                      |
| Then, point your browser to http://server//ocsreports
|        to configure database server and create/update schema.        |
+----------------------------------------------------------------------+


Setup has created a log file /tmp/OCSNG_UNIX_SERVER_2.5/ocs_server_setup.log. Please, save this file.
If you encounter error while running OCS Inventory NG Management server,
we can ask you to show us his content !

DON'T FORGET TO RESTART APACHE DAEMON !

Enjoy OCS Inventory NG ;-)
3.3.- Creación de los links simbólicos
Este va a dar de alta la dirección de la web http://DireccioDeTuServer/ocsreports
sudo ln -s /etc/apache2/conf-available/ocsinventory-reports.conf /etc/apache2/sites-enabled/ocsinventory-reports.conf
Este va a dar de alta la dirección donde se recogen los inventarios por parte del servidor http://DireccioDeTuServer/ocsinventrory
sudo ln -s /etc/apache2/conf-available/z-ocsinventory-server.conf /etc/apache2/sites-enabled/z-ocsinventory-server.conf
Reiniciamos apache y probados desde un navegador la url : http://DireccioDeTuServer/ocsreports
sudo service apache2 restart
3.4.- Ampliar limite máximo de tamaño de archivo
La primera advertencia señala que tenemos un limite de 100MB, esto lo podemos ampliar si es necesario editando el fichero de configuración ocsinventory-reports.conf
sudo vi /etc/apache2/conf-available/ocsinventory-reports.conf
Buscamos y modificamos las lineas, en el ejemplo amplio a 200M
A nosotros nos aplica la configuración php7 pero modificaremos las dos
    # Uncomment following to force use of HTTPS in Administration Server
    #SSLRequireSSL

    # PHP tuning (not working on all distribution, use php.ini instead)

        AddType application/x-httpd-php .php
        php_flag file_uploads           on
        # Some PHP tuning for deployment feature up to 8 MB
        # post_max_size must be greater than upload_max_filesize
        # because of HTTP headers
        php_value post_max_size         200m
        php_value upload_max_filesize   200m
        # You may have to uncomment following on errors
        #php_value max_execution_time -1
        #php_value max_input_time -1

        # Uncomment following if you need to specify a mysql socket
        #php_value mysql.default_socket "path/to/mysql/unix/socket"

        #!! Mandatory !! : set magic_quotes_gpc to off (to make ocsreports works correctly)
        php_flag magic_quotes_gpc      off

    # Duplicate for php7 compatibility

        AddType application/x-httpd-php .php
        php_flag file_uploads           on
        # Some PHP tuning for deployment feature up to 8 MB
        # post_max_size must be greater than upload_max_filesize
        # because of HTTP headers
        php_value post_max_size         200m
        php_value upload_max_filesize   200m
        # You may have to uncomment following on errors
        #php_value max_execution_time -1
        #php_value max_input_time -1

        # Uncomment following if you need to specify a mysql socket
        #php_value mysql.default_socket "path/to/mysql/unix/socket"

        #!! Mandatory !! : set magic_quotes_gpc to off (to make ocsreports works correctly)
        php_flag magic_quotes_gpc      off
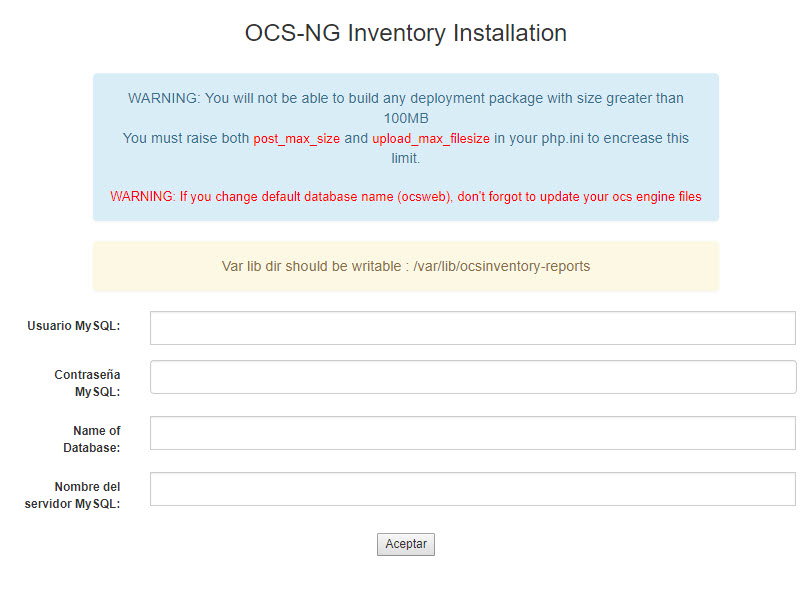
3.5.- Eliminar advertencia de escritura en carpeta: /var/lib/ocsinventory-reports
Var lib dir should be writable : /var/lib/ocsinventory-reports
Para solucionar esto concedemos la propiedad de la carpeta al usuario www-data
sudo chown www-data:www-data -R /var/lib/ocsinventory-reports
3.6.- Finalizamos la instalación
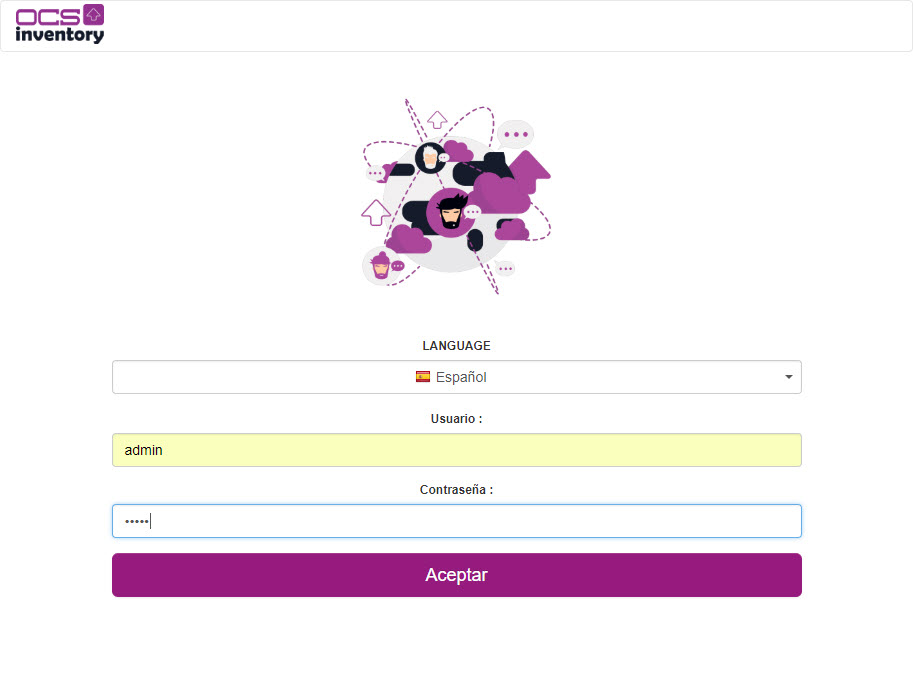
Rellenamos los campos necesarios con los datos que hemos creado en el apartado 2.4
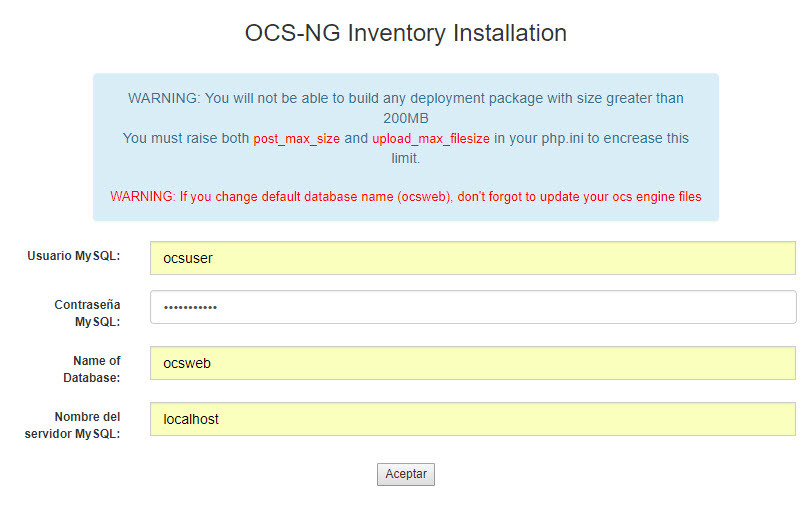
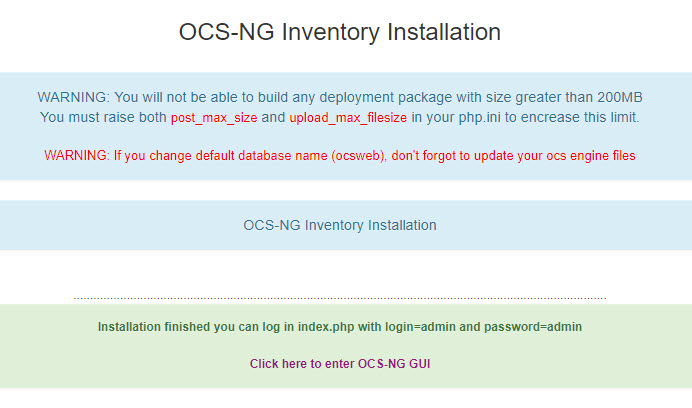
Ya podemos acceder con el usuario admin y password admin
3.7.- Eliminar el fichero install.php
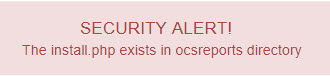
SECURITY ALERT!
sudo mv /usr/share/ocsinventory-reports/ocsreports/install.php /usr/share/ocsinventory-reports/ocsreports/install.php_old
3.8.- Modificar el fichero de configuración z-ocsinventory-server.conf para que los inventarios puedan subir a la base de datos.
De no modificar correctamente este archivo con los datos de conexión a nuestra base de datos, los inventarios nunca van a subir al servidor.
sudo vi /etc/apache2/conf-available/z-ocsinventory-server.conf
  # Which version of mod_perl we are using
  # For mod_perl <= 1.999_21, replace 2 by 1 # For mod_perl > 1.999_21, replace 2 by 2
  PerlSetEnv OCS_MODPERL_VERSION 2

  # Master Database settings
  # Replace localhost by hostname or ip of MySQL server for WRITE
  PerlSetEnv OCS_DB_HOST localhost
  # Replace 3306 by port where running MySQL server, generally 3306
  PerlSetEnv OCS_DB_PORT 3306
  # Name of database
  PerlSetEnv OCS_DB_NAME ocsweb
  PerlSetEnv OCS_DB_LOCAL ocsweb
  # User allowed to connect to database
  PerlSetEnv OCS_DB_USER ocsuser
  # Password for user
  PerlSetVar OCS_DB_PWD ocspassword
Reiniciamos servidor apache
sudo service apache2 restart
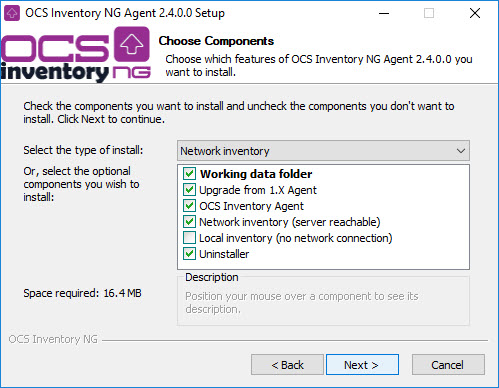
4.- Instalar agente
Nuevamente des de la web de OCS podemos descargar los diferentes agentes actualizados, en este caso instalaremos el 2.4.0.0 primero de manera manual y posteriormente en modo desatendido, muy útil para instalaciones masivas o recurrentes.
Web de descarga del agente: https://www.ocsinventory-ng.org/en/
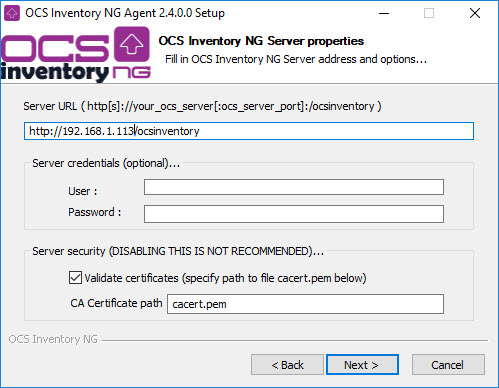
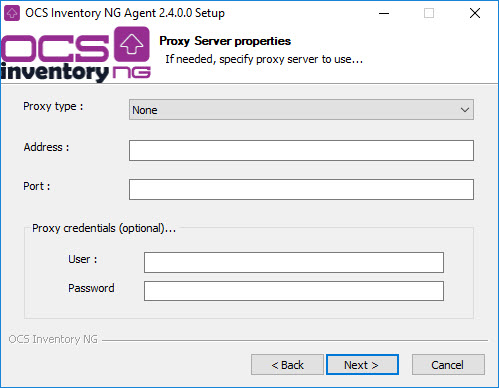
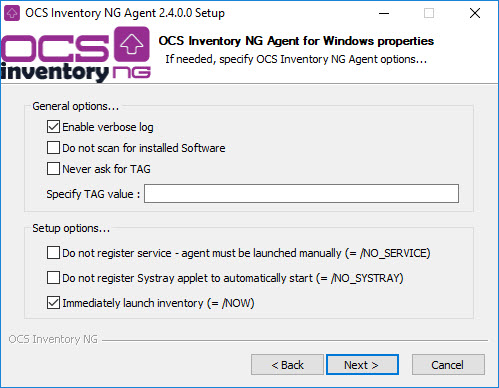
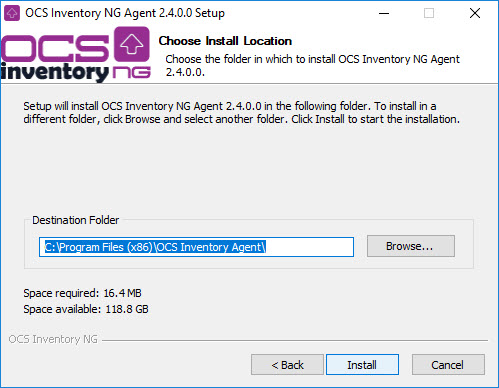
4.1.- Instalación manual
4.2.- Instalación desatendida
Creamos un fichero .bat en la carpeta del instalador con los parámetros de servidor, ejecutar el fichero bat tendrá el mismo efecto en el equipo que la instalación que hemos visto en el apartado 4.1
OCS-NG-Windows-Agent-Setup.exe /SERVER=http://192.168.1.113/ocsinventory /TAG= /NOW /S
Hola vengo haciendo pruebas con ocs y fusionivnetory y me he decantado por este ultimo.
Para poder desinstalar el servidor de ocs Inventory como habria que proceder ? Gracias
I am error Service encounter error Failed to talk with Communication Server)>.
Client installation ! tks
Mil gracias por la ayuda, esta explicado de forma genial.
Un saludo
Hola que tal, seguí tu manual de instalación y me funciona de maravilla, nada más que instale la version 2.6 y pues ahora quiero hacer funcionar los plugins que ahora se llaman extensions en esta versión, quiero pedirte el favorsote si no es mucho pedir como instalarlos en la version 2.6, te lo agradecería bastante.
No detecta ningún agente
Tengo un servidor con OCS que funciona bien y un equipo con agent que se ha inventariado correctamente en una base de datos
Ahora yo quiero inventariar más, pero organizarlos mejor
Quiero añadir más bases de datos y meter esos equipos en esas diferentes bases de datos, pero no sé como configurarlo para decirle a un cliente que haga el inventario y se hagan en la base de datos que yo le diga
Ejemplo: Tengo 6 equipos. Son de diferentes domicilios y me gustaría ordenarlos por casas. Casa1, Casa2 y Casa3.
Cada una de esas casas tendría su propia base de datos
Como puedo hacer que se haga el inventario del equipo en una base de datos o en otra?
Solo tengo un servidor. Quiero que esas bases de datos estén en ese servidor
No puedes conectarlo a multiples BD simultáneas, pero puedes etiquetarlos usandando el TAG, así los puedes ir seccionando por departamentos, pisos, áreas, etc
Todo bien mi pai, funka 100% real no fake
He seguido los pasos al dedillo, pero no me funciona.
Hay un error en sudo tar -zxvf OCSNG_UNIX_SERVER_2.5.tar.gz
Simplemente es sudo tar -xf OCSNG_UNIX_SERVER_2.5.tar.gz
Excelente tutorial amigo, me ha servido mucho!!
Moltes gràcies,m’ha anat genial per implementar-lo a la meva empresa.
buenas, me da error el siguiente comando:
sudo cpan -i XML::Entities Compress::Zlib Archive::Zip Mojolicious::Lite Switch Plack::Handler
¿habría alguna forma de hacerlo a mano?
Esta hecho con las patas el paso a paso.
Las dependencias PERL, instalalas 1 a 1. éstas son las que necesitas:
# apt-get install libsoap-lite-perl
# cpan -i XML::Entities
# cpan -i SOAP::Transport::HTTP::Nginx
# cpan -i mod_perl2
# cpan -i Apache2::SOAP
Después de ingresar a editar la dimensión en php7 como guardo los cambios efectuados, teniendo en cuenta que despues de acceder al equipo por ssh no quiere reconecer el comando para salir de la edición